Tuesday 30 April 2013

Make A Monster ...... not just for boys :o)


I have been playing with the Make A Monster stamp set (page 64 Main Catalogue) for a few days - getting ready for my Monthly Classes for May.


This card was inspired by the current Sketch from The Paper Players

My classes next month are to make cards for young boys, so I wanted this one to be for a little girl to show my ladies how versatile the stamp set is :o)

Stamp Sets: Make A Monster, A Fitting Occasion 
Colours: Daffodil Delight, Melon Mambo, Old Olive, Whisper White
Papers: Sunshine & Sprinkles DSP
Punches: 2 ½” Circle, 2 3/8” Scallop Circle, 1 ¼” Scallop Circle, 1” Circle

Sunday 28 April 2013

TSOT - Betsy's Blossoms


I used this weeks sketch at Try Stampin' On Tuesday for the above card. Another lovely bright card using the Sunshine & Sprinkles DSP .... this time with the Betsy's Blossom stamp set.

Stamps : Betsy's Blossom, Bring On The Cake
Papers : Sunshine & Sprinkles DSP
Ribbon : Melon Mambo Striped Organdy
Colours : Marina Mist, Melon Mambo, Daffodil Delight, Whisper White

Friday 26 April 2013

Freshly Made Sketches - Up, Up & Away!


A nice bright card for you today :o)

I decided to use the latest sketch at Freshly Made Sketches for this card. 

Stamp Set : Up, Up & Away
Papers : Sunshine & Sprinkles DSP
Ribbon : Marina Mist Striped Organdy
Colours : Daffodil Delight, Marina Mist, Melon Mambo
Big Shot : Cloudy Day Embossing Folder

Monday 22 April 2013

Technique - Marker Thumping


 The wonderful France Martin uploaded a video on this technique yesterday. It's one I've had on my list to try for a long time. I'd just never got round to it. So seeing France's video of her beautiful cards inspired me to have a go today.

I tried it first with the Sweet Floral background stamp. It didn't give me the result I had 'pictured' in my head, but it's ok ..... and I didn't bin it :o) I'll have to try this one again later.


I decided to have a go with the Swallowtail background stamp .... which is the stamp France used. And ....... it's fab. I wanted to try different colours to France and create a 'Male' version for my ladies to do in next month's Technique class. I then tried out one with pinks :o)


I used Sahara Sand for the base colour and Bravo Burgundy, Not Quite Navy and More Mustard Markers for the 'Thumping'.


For this one, I used Pink Pirouette for the base colour and Regal Rose, Wisteria Wonder and Melon Mambo Markers. I also used White Glossy card stock on this one - the 'Male' version is stamped onto Whisper White.

The Technique is really simple to do ......

Ink up your stamp with a light colour ink. Choose your marker colours - a mix of light and dark works well. Starting with the lightest colour gently 'Thump' or 'Bounce' the Brush Tip of the Marker all over the stamp. Repeat with the remaining colours. 'Huff' and stamp the image. 

Wednesday 17 April 2013

Secret Garden - Project Class


This month's project classes used the beautiful Secret Garden stamp set and matching Framelits - Spring/Summer catalogue page   17.

The colour combination used for this set was Crumb Cake, Wisteria Wonder and Whisper White.

The lovely papers are from the In Color DSP Stack 2011 - 2013.

The set consists of a box to hold cards and envelopes and three coordinating Birthday cards.

If you would like to purchase the instructions for this set, you will find the details below. The PDF will be emailed to you within 48 hours ....


Secret Garden - Class Instructions - £3.00


Friday 12 April 2013

More Party Gifts .....


This is another gift set I used during recent Parties.

This one uses both sizes of the Soda Pop Tops as the focal points. These work perfectly with the lovely Collage Curios stamp set.

The little bag on the right was created using the Fancy Favour Big Shot Die. I cut a Windows Framelit for the top and embossed this with the Honeycomb Embossing Folder. Although the Windows Framelits were in our Autumn/Winter catalogue, they are still available to buy - you can find them on page 35 of the Spring/Summer catalogue.

The sentiment is from Itty Bitty Banners and cut using the matching Framelits.

The gorgeous papers are from Twitterpated DSP.

Wednesday 10 April 2013

Scrapbook Page!


A few weeks ago I was asked to do a Party but with a Scrapbook Page as the Make and Take ..... this is the 12"x12" page that everyone created.

I used a sheet of the new Pool Party Core'dinations card stock. This was lightly sanded all over and the edges distressed with our new Distressing Tool.

The left hand side and bottom were then stamped using some of the flowers from the Secret Garden stamp set, with Pool Party ink. 

The papers used are the Sycamore Street DSP - one of the options that was available during the Sale-a-Bration Promotion.

More flowers were stamped onto Whisper White card stock, using Island Indigo ink and these were cut out using the matching framelits.

The leaves were stamped in Summer Starfruit and also cut using the framelits.

The little journalling panel is punched using the Decorative Label punch and tucked behind the Summer Starfruit photo mat.

Finally, a little of the Sycamore Street ribbon was added to one of the DSP strips.

I loved doing this Party for my Hostess! If you would like a party .... and would like it to be a little different to the norm, why not contact me to discuss some ideas :o)

Monday 8 April 2013

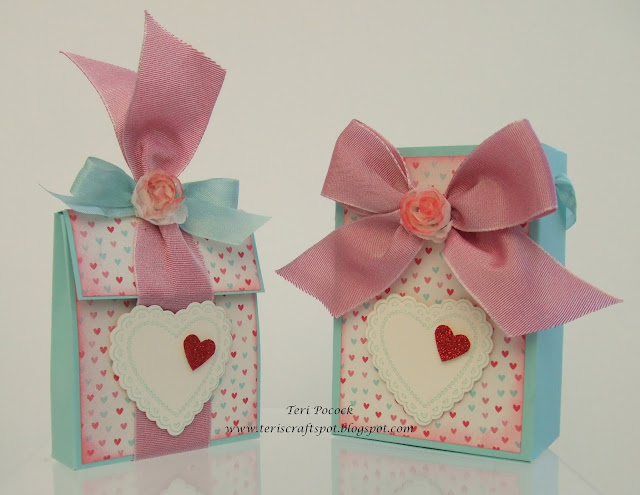
Party Gifts!


This set is one I used for some of my Parties during the recent Sale-a-Bration promotion period.

The Hostess gift box (left) contains product samples of ribbon and other accessories. I gave this to my Hostesses as a 'Thank you' gift from me for holding a Party :o)

The Door Prize gift box (right) contains some rather fabulous chocolates and this is 'won' by one of the attendees.

I used the Hearts a Flutter stamps set together with a little of the More Amore Speciality papers (pages 10 and 11 Spring/Summer Catalogue). The gorgeous pink ribbon is the Two Tone Ribbon (page 13 Spring/Summer Catalogue). The blue ribbon is the Pool Party Seam Binding (page 172 Main Catalogue). 

Thursday 4 April 2013

Stampin' Up! - Colour Refresh!

Stampin' Up! have announced today that there will be changes to their Core Colours Collections! These changes will not take place until the release of the New Catalogue in July, but they are preparing us for it now :o)

10 of our existing colours will be discontinued and we will have 10 'new' colours in their place. 


You can see on the above chart how the Four Colour Collections will look on July 1st.

Please Note that the discontinued colours will only be available from now while stocks last! So if some of your favourites are listed there, NOW is the time to stock up on these!

Wednesday 3 April 2013

Team Training Day - Swaps and Rewards


These were the amazing swaps that everyone exchanged on the day! 

Whenever Demos' get together we always do some swapping! Everyone makes a set of either card fronts or small 3D items. 

We all swap with each other, so end up with lots of new ideas and pieces of inspiration that we can either use in our Business or for our own personal crafting.


We had two Team Promotions to celebrate on the day. Both Lynne and Sue had reached Bronze 2. This was their first Stampin' Up! Promotion and they both received a card and small gift from me.

The little boxes contain a Team Key Ring. All my Team receive one on their first Promotion together with a bead to put on it. They then receive further beads for each additional promotion they get and for each person they recruit. They also received a pack of Jumbo Pearls each.

Tuesday 2 April 2013

Team Training Day - Mini Explosion Box


This was the final project for the Training day.

I love this little box, it's just so cute! It's made using a 6" x 6" piece of cardstock and is a lovely quick and simple project to create.


This one was a perfect size to hold a single Ferrerro Rocher Chocolate. 

Monday 1 April 2013

Team Training - Mini Easter Basket


This little basket was inspired by Connie Stewart, another amazing US Demo! 

Connie showed how to create one on her blog using the largest of the Oval Framelits. I just adapted the design to create a mini version, using the No. 4 Oval Framelit. It's just big enough to hold a couple of the mini chocolate eggs .... a little treat for my ladies :o)

The sides of the basket are embossed using the Fancy Fan Folder. The image comes from the Everybunny stamp set and has been coloured using the ink pads and Blender Pens.